
(Source: Dr Mohamed Elfekky, n.d.)
If you’ve been dealing with pain just below your kneecap that keeps coming back every time you run, jump or squat, you may have jumper’s knee.
Also known as patellar tendinopathy, this is a common problem in sports such as basketball, volleyball, netball, and football, where the knees are repeatedly loaded during jumping, landing, and quick changes of direction.
It can be frustrating, especially when taking a few days off from training doesn’t seem to make much difference. The key to getting on top of jumper’s knee is understanding why the tendon is painful and knowing how to build its strength back up.
What is jumper’s knee?
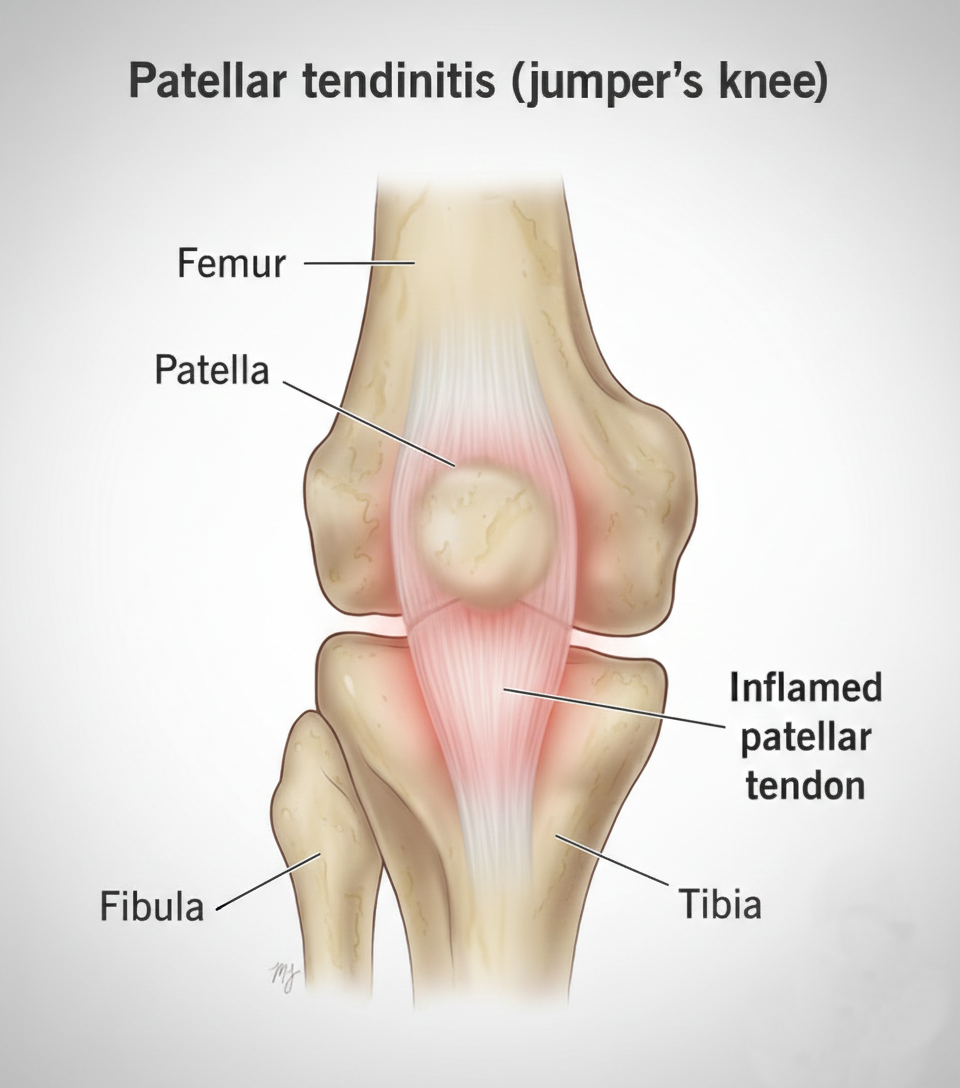
The patellar tendon connects your kneecap (patella) to your shinbone (tibia). It works with your quadriceps muscles to straighten your knee when you run, jump, kick, or get up from a squat.
During jumping and landing, the tendon has to cope with considerable force. If you’re repeatedly asking more of it than it can comfortably handle, it can become painful and develop changes in its structure. This is known as patellar tendinopathy.
Normally, the collagen fibres within a tendon are arranged in an organised pattern that helps it cope with these forces. With tendinopathy, this structure can become disrupted, and the tendon may thicken and become less tolerant of heavy activity.
Pain is usually felt around the lower edge of the kneecap. It often starts during activities such as jumping, running, or squatting and may become more noticeable as training loads increase.
Why does it happen?
Jumper’s knee is particularly common in athletes who regularly perform explosive movements, but it can affect anyone who places repeated demands on the patellar tendon.
One of the biggest contributors is a sudden increase in training. For example, returning to pre-season after a break, adding extra matches or introducing more jumping drills can put the tendon under more stress than it’s ready for.
Other factors can contribute, including:
- Quadriceps strength: If your quads aren’t strong enough for the demands of your sport, you may struggle to manage repeated jumping and landing.
- Hip strength and control: Hip weakness or poor control of your leg position may affect how you move during squats, running and landings.
- Ankle mobility: Limited ankle movement can change the way you squat and land, placing different demands on your knee.
- Changes in training and playing surfaces: Moving from grass to a hard court, for example, can increase the demands on your legs if you haven’t had time to adapt.
- Recovery between sessions: Repeated hard training sessions without enough recovery can make it harder for the tendon to keep up.
These factors won’t necessarily cause jumper’s knee on their own, but they’re worth considering when working out why the problem has developed and how to prevent it from returning.
How is jumper’s knee diagnosed?
A physiotherapist will usually diagnose patellar tendinopathy by asking about your symptoms, training history, and the activities that make your knee hurt.
They may check for tenderness just below the kneecap, assess your quadriceps strength, and see how your knee responds to movements such as squats or single-leg decline squats.
An ultrasound or MRI isn’t always needed. Scans can show changes in the tendon, but these don’t necessarily tell us how painful it should be. Some people have changes on a scan without any symptoms, while others experience significant pain despite relatively minor findings.
It’s also important to rule out other causes of knee pain. Pain above the kneecap may involve the quadriceps tendon, while pain around the bony bump below the kneecap in teenagers may be related to Osgood-Schlatter disease. Getting the diagnosis right helps ensure you’re following the right treatment plan.
Why resting your knee isn’t always the answer
Taking a break from jumping or running can help settle the pain, particularly if you’ve been pushing through it for weeks. However, rest alone doesn’t necessarily fix the underlying problem.
The tendon still needs to be strong enough to handle the demands of your sport. If you stop exercising until the pain disappears, then jump straight back into full training, there’s a good chance the symptoms will return.
The answer is to gradually build your strength and tolerance to exercise, starting with movements you can manage and progressing towards the activities that challenge your knee the most.
Four stages of jumper’s knee rehabilitation
The following stages provide a general guide to rehabilitation. You may need to spend longer on some stages than others, depending on how your knee responds.
Stage 1: Manage pain with isometric exercises
Isometric exercises involve contracting a muscle without moving the joint. They can help settle tendon pain and are often a good starting point when squats and other exercises are uncomfortable.
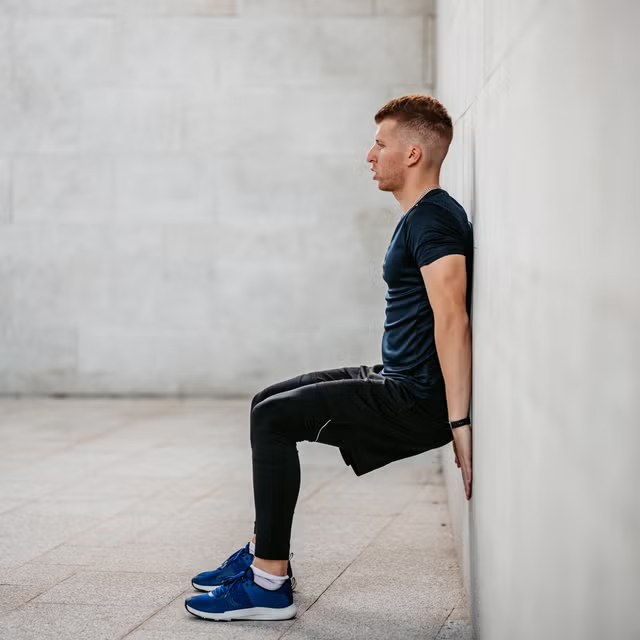
Try a wall sit:
- Stand with your back against a wall and your feet shoulder-width apart.
- Slide down into a comfortable partial squat.
- Hold for 30–45 seconds.
- Rest for 1–2 minutes and repeat for up to five sets, as tolerated.
If your knee hurts too much, stand a little taller to reduce the bend in your knees.
These exercises can provide temporary pain relief, but they aren’t the whole solution. As your symptoms settle, you’ll need to progress to strengthening exercises.
When to progress: When everyday activities are becoming easier and you can complete your wall sits with minimal discomfort.
(Source: Men’s Health, 2025)
Stage 2: Build strength with resistance training
Once your knee is tolerating exercise more comfortably, the next step is to build up your quadriceps and the tendon itself.
Exercises may include:
- Leg press.
- Goblet squats or barbell squats.
- Split squats.
- Single-leg leg press variations.
Start with a weight you can manage comfortably and lower and lift it slowly, taking around three seconds in each direction. Depending on the exercise, a starting point might be 3–4 sets of 8–15 repetitions.
For many people, three sessions per week works well, with rest days between harder strength sessions. As the exercises become easier, gradually increase the weight or difficulty.
Heavy, slow resistance training is a well-supported treatment for patellar tendinopathy. The aim is to make the tendon stronger so it can cope with the forces involved in running and jumping.
When to progress: When your knee is handling strength training well, everyday pain has reduced and you can perform more demanding exercises without a significant flare-up.
Stage 3: Get back to jumping
Being able to squat or use the leg press without much pain doesn’t automatically mean you’re ready to return to jumping. Jumping places different demands on the tendon, so it needs to be reintroduced gradually.
Depending on your progress, exercises may include:
- Small, controlled two-legged jumps.
- Skipping or jump rope.
- Repeated jumping and landing drills.
- Single-leg hops.
- More demanding plyometric exercises.
Start with small, controlled movements before increasing jump height, speed and repetitions. Progress from two-legged jumps to single-leg activities as your knee becomes more comfortable with the extra load.
If your knee is noticeably more painful later that day or the following morning, you may have done too much. Reduce the intensity or volume before trying to progress again.
When to progress: When you can complete increasingly challenging jumping and landing exercises without a significant increase in symptoms.
Stage 4: Return to your sport
The final stage is about preparing your knee for the movements you need to perform during training and competition.
For a basketball player, this might mean repeated jumps, cutting, and quick changes of direction. For a netball player, it could involve landing, pivoting, and accelerating. Footballers may need to work on sprinting, kicking, and changing direction at speed.
Start with modified training and controlled drills before gradually returning to full training and competition. Avoid increasing both training volume and intensity too quickly.
Before returning to unrestricted sport, it’s worth checking that you can:
- Perform sport-specific movements with minimal pain, ideally around 2/10 or less.
- Produce at least 90% of the strength of your uninjured leg, where appropriate.
- Complete single-leg and triple-hop tests with results within approximately 10% of the opposite leg.
- Jump, land, sprint and change direction with good control.
- Complete training drills confidently without a significant increase in symptoms afterwards.
These are useful guidelines rather than strict rules for everyone. Your physiotherapist can help determine whether you’re ready to return to full training based on your sport, symptoms and strength.
How much pain is okay during rehab?
You don’t necessarily need to be completely pain-free during every exercise, but you shouldn’t be pushing through significant or worsening pain either.
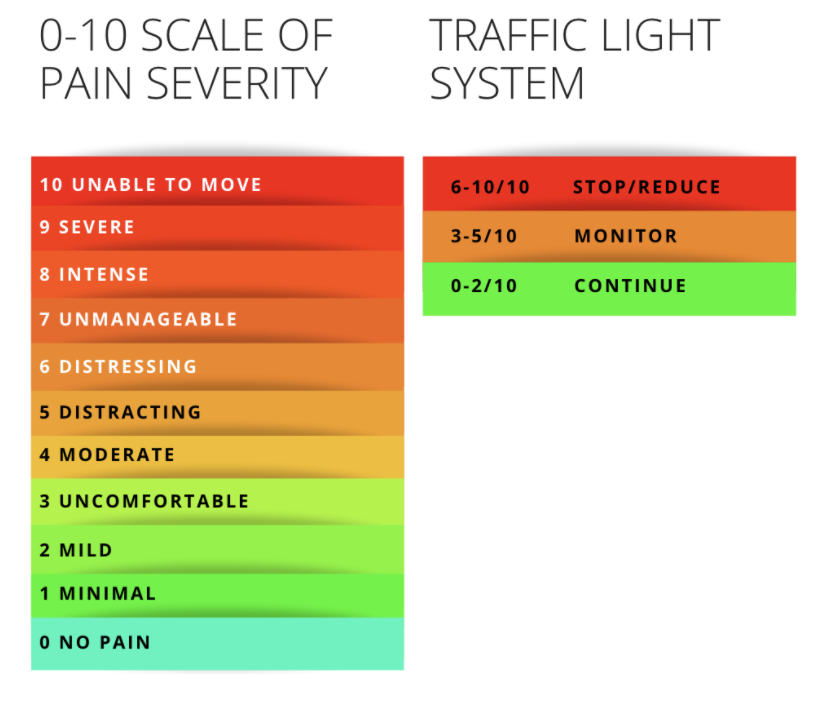
A useful starting point is to keep pain around 3/10 or lower during rehabilitation exercises. Your physiotherapist may adjust this depending on your symptoms and the stage of your recovery.
It’s also important to pay attention to how your knee feels the next morning. If it’s noticeably more painful or stiff than usual, reduce the weight, repetitions or intensity at your next session.
This helps you find the right balance between challenging the tendon enough to improve and giving it time to recover.
(Source: Core Concepts, n.d.)
How long does recovery take?
Recovery depends on how long you’ve had symptoms, how irritable the tendon is and the demands of your sport.
Some people notice meaningful improvements within 8–12 weeks of consistent rehabilitation, while longer-standing cases can take several months. Returning to sport often takes longer than simply getting through everyday activities without pain.
It’s tempting to return as soon as your knee starts feeling better, but rushing back into full training can bring the problem straight back. Gradually rebuilding your strength and jumping capacity gives you a better chance of making lasting progress.
When should you see a physiotherapist?
If your knee pain has been hanging around for several weeks, is affecting your training or keeps returning whenever you increase activity, a physiotherapist can help you work out what’s going on.
They can assess your knee, identify any contributing strength or movement issues, and put together a rehabilitation plan suited to your current fitness and sporting goals.
If you’re not making progress after 4–6 weeks of consistent, appropriately modified rehabilitation, it’s worth having your diagnosis and treatment plan reviewed.
Seek prompt medical assessment if you experience a sudden pop, significant swelling, severe pain following an injury, or an inability to straighten your knee or bear weight.
Ready to get back to sport?
Jumper’s knee can be frustrating, particularly when it keeps you away from the activities you enjoy. The good news is that you don’t necessarily need to stop everything until the pain disappears.
With the right balance of training modification, progressive strengthening, and a gradual return to jumping, you can work towards getting your knee back to where it needs to be.
At Physio on Ross, we can help identify what’s contributing to your knee pain and guide you through a rehabilitation programme tailored to your goals and sport. If you think you might have “Jumper’s Knee”, give our reception a ring at (07) 47282116 to make an appointment with one of our physios or book online.


